Apple Pie Dinghy Build
Almost done. I have been involved in an accelerated build of an Apple Pie Dinghy. The plans are free online and I wanted a hard dinghy to tow behind the S22 for a couple of camping trips this summer. It has purely been a build of, "Let's get something sturdy that floats", kind of affair as I haven't been overly concerned with finish quality.
It is nearly complete. I will post the final images later along with the first launch.
So, about the Apple Pie Dinghy, it is supposed to be able to carry 3 persons. I hope this to be my spouse, my daughter and myself. That's going to be approx 325lbs give or take. I am the largest at 165lbs, we are all "light boned".
Typical stitch and glue construction and I took liberties with the design to accommodate materials I happened to have on hand and to make a couple of airtight compartments. It has ended up a little heavier because of these mods. So far, it has probably been about $150 to $175 dollars US in materials, epoxy and paint. I likely could have done it cheaper if I had used polyester resin ( but I have grown to hate the stuff in hot weather because it cures so fast). Paint was $30 and the 1/4 inch exterior grade ply was about $25 a sheet and you need two. The rest was better epoxy, brushes and some glass ( I already had a good bit of tape).
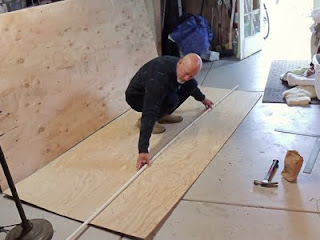 Here I am laying out the lines to cut. For all these I will use a hand held circular saw. Gives cleaner cuts than a jig saw.
 This is a detail of the sprinkler pipe I am using tide with string to the nails which mark the lines.

Here the panels are laid out after having been cut.

Starting the "stitch" part of the process. I have already drilled the holes for the zip ties by laying the various panels on top of one another. I was pretty surprised by the amount of force required to bend the panels, especially near the bow. It wasn't that much work, but it was torturing the plywood.

Four out of five panels zipped.

All the panels stitched together. I love this process for quick boat building.

Internal seams filleted and taped. I went ahead and did everything at once, made the fillet with epoxy and medium hardener ( marine variety from Tap plastics ), taped it and wetted it out. I used to use the Marine variety of Bondo polyester epoxy resin, but with a working time of 15 minutes, it was always a mess. It also tends to be a pain when it comes to sanding, gums up the sand paper. I found this to be true of the same stuff from West marine. Looks and smells identical and is a pain to work with. I may consider it again when building another boat, but I'll look for something with a longer "pot" time.

Fillet detail with tape on the joint.
 I'm not sure what to call these, gunwales, rub rails? Regardless, I should have waited till I had finished the exterior sanding and taping, but for some reason I didn't. Part of it was the boat was square at this point and I was reluctant to flip it yet as I wanted to keep it symmetrical. Yes, I thought this would help and no it didn't. The ull would stiffen up till I had the bulkheads in. A big part of this was because i had used 1/4 for the bow and stern pieces and the plans called for 1/2 inch ply to be used. I opted to reinforce these places with some 1/2 pine which you'll see later.

Here we are flipped and ready to trim off the zip ties with a sharp wood chisel.

By now I have rounded the edges and wetted out the joints in anticipation of laying tape and the glass for the boats bottom.

Did a large single piece of fiberglass fabric for the bottom and taped the edges whiles everything was still wet. Remember, I like using boats, not sure how i feel about building them yet.

Ok, here are the bulkheads which also form the support for the seats.

Seats in. this is one of my big regrets. I should have been more thoughtful with this deviation from the plans. They work fine, but I had to improvise and the results aren't especially pretty where the bulkhead meets the seat. I may fix it next year if needed.

Here is the reinforcement of the bow and stern. Yes, should have put it on the inside in hindsight.

View from the stern.

First coat of primer.
So, I will wait to show the final image when the boat is complete. I am just waiting on a couple of details and then a naming and launch. I'll be sure to post.
It is nearly complete. I will post the final images later along with the first launch.
So, about the Apple Pie Dinghy, it is supposed to be able to carry 3 persons. I hope this to be my spouse, my daughter and myself. That's going to be approx 325lbs give or take. I am the largest at 165lbs, we are all "light boned".
Typical stitch and glue construction and I took liberties with the design to accommodate materials I happened to have on hand and to make a couple of airtight compartments. It has ended up a little heavier because of these mods. So far, it has probably been about $150 to $175 dollars US in materials, epoxy and paint. I likely could have done it cheaper if I had used polyester resin ( but I have grown to hate the stuff in hot weather because it cures so fast). Paint was $30 and the 1/4 inch exterior grade ply was about $25 a sheet and you need two. The rest was better epoxy, brushes and some glass ( I already had a good bit of tape).
 Here I am laying out the lines to cut. For all these I will use a hand held circular saw. Gives cleaner cuts than a jig saw.
 This is a detail of the sprinkler pipe I am using tide with string to the nails which mark the lines.
Here the panels are laid out after having been cut.

Starting the "stitch" part of the process. I have already drilled the holes for the zip ties by laying the various panels on top of one another. I was pretty surprised by the amount of force required to bend the panels, especially near the bow. It wasn't that much work, but it was torturing the plywood.

Four out of five panels zipped.

All the panels stitched together. I love this process for quick boat building.

Internal seams filleted and taped. I went ahead and did everything at once, made the fillet with epoxy and medium hardener ( marine variety from Tap plastics ), taped it and wetted it out. I used to use the Marine variety of Bondo polyester epoxy resin, but with a working time of 15 minutes, it was always a mess. It also tends to be a pain when it comes to sanding, gums up the sand paper. I found this to be true of the same stuff from West marine. Looks and smells identical and is a pain to work with. I may consider it again when building another boat, but I'll look for something with a longer "pot" time.

Fillet detail with tape on the joint.
 I'm not sure what to call these, gunwales, rub rails? Regardless, I should have waited till I had finished the exterior sanding and taping, but for some reason I didn't. Part of it was the boat was square at this point and I was reluctant to flip it yet as I wanted to keep it symmetrical. Yes, I thought this would help and no it didn't. The ull would stiffen up till I had the bulkheads in. A big part of this was because i had used 1/4 for the bow and stern pieces and the plans called for 1/2 inch ply to be used. I opted to reinforce these places with some 1/2 pine which you'll see later.
Here we are flipped and ready to trim off the zip ties with a sharp wood chisel.

By now I have rounded the edges and wetted out the joints in anticipation of laying tape and the glass for the boats bottom.

Did a large single piece of fiberglass fabric for the bottom and taped the edges whiles everything was still wet. Remember, I like using boats, not sure how i feel about building them yet.

Ok, here are the bulkheads which also form the support for the seats.

Seats in. this is one of my big regrets. I should have been more thoughtful with this deviation from the plans. They work fine, but I had to improvise and the results aren't especially pretty where the bulkhead meets the seat. I may fix it next year if needed.

Here is the reinforcement of the bow and stern. Yes, should have put it on the inside in hindsight.

View from the stern.

First coat of primer.
So, I will wait to show the final image when the boat is complete. I am just waiting on a couple of details and then a naming and launch. I'll be sure to post.
Comments